In Windows Media Player, you can use the combination of different keyboard keys to accomplish routine task. By using these keys, you can increase the working speed in media player, otherwise require a conventional mouse to select menus and buttons options. Basically keyboard shortcuts keys help you to save time and you can perform any tasks without leaving the keyboard keys.
Shortcut keys Action
ALT+1 Adjust zoom to 50 percent
ALT+2 Adjust zoom to 100 percent
ALT+3 Adjust zoom to 200 percent
ALT+ENTER Display the video in full mode
ALT+F Go to media player File Menu
ALT+T Go to media player Tools Menu
ALT+V Go to media player View Menu
ALT+P Go to media player Play Menu
ALT+F4 Use to close media player
CTRL+1 Display media player in full mode
CTRL+2 Display media player in skin mode
CTRL+B Use to play the previous item in media player
CTRL+F Use to play the next item in media player
CTRL+E Use to Eject CD or DVD from CD or DVD drive
CTRL+P Use to Play or Pause the item in media player
CTRL+T Use to Repeat the items in media player
CTRL+SHIFT+B Use to Rewind a file in media player
CTRL+SHIFT+F Use to Fast Forward a file in media player
CTRL+SHIFT+S Use to play items slower than a normal speed
CTRL+SHIFT+ G Use to play items faster than a normal speed
CTRL+SHIFT+ N Use to play items at normal speed in media player
F8 Use to mute the volume in media player
F9 Use to decrease the volume in media player
F10 Use to increase the volume in media player
ENTER or SPACEBAR Use to play an item
Saturday, February 27, 2010
How to restore the System State data backup in XP [TRICK]
Today tip help you to restore the System State data backup to recover the windows critical components and return to your computer to earlier state. With restoring the system state back up, you are going to recover the systems Active Directory, System volume (SYSVOL), COM+ class registration database, Windows registry and Windows boot files.
Follow the given steps to run System State data restore wizard:
To use this feature, you will need to be logged into your computer with administrative rights.
First must make sure, you have the system state backup on your disk.
Click on Start button> All programs> Accessories> System Tools then click on Backup.
Now by default backup wizard will start, click on advanced mode option to change the restore settings.
Here a dialog box will appear with title "Backup Utility", select "Welcome" tab and click on Restore Wizard [Advanced] button to restore the backup of important windows components.
Click on Next button to continue restore wizard.
Here click on Browse button to specify the source of backup file and then select item to restore.
Now verify your selected settings and click on Finish button.
At the end, system will display a warning message "Restoring System State will always overwrite current system state unless restoring to an alternate location" press Ok button to start restore process.
How to Configure Windows XP to send and receive Fax [TIP]
If you are using windows XP, you can use sending and receiving option for fax service built into windows XP. You can enjoy free facilities of fax from your computer, because buying a dedicated fax machine for home or small office may not be a feasible option. Using windows XP based fax services; you can read, save, forward, delete the fax messages. By default fax service is not installed in your windows XP, but if you have windows XP CD, you can install fax feature using Add or Remove Program option.
Follow the gives steps to install fax components:
To install this feature, you will need to be logged into your computer with administrative rights.
Make sure, you have installed modem driver on your computer before running fax components setup.
Now click on Start button and go to System Control Panel then double click on Add or Remove Program.
Select the Fax services check box under Add or Remove Windows components.
Now click Next to finish the fax installation wizard and close it.
After the fax components installed, now configure the fax setting before using it.
First click on Start button, go to All Programs> Accessories> Communications then click on Fax Console.
Now in fax configuration wizard, type the fax cover page information then click on Next.
Select the suitable modem for fax and also enable others send and receive options.
Now type the TSID (Transmitting Subscriber Identification) and click Next then type here CSID (Called Subscriber Identification) and again Next.
At the end select the printer to be automatically printing the fax and click to finish.
How to move your mouse cursor without mouse [TIP]
You can control your mouse pointer with keyboard keys in all windows versions. When your mouse stops working, you can enable this keyboard feature to complete your important work. This keyboard mouse can performs all tasks same like a normal mouse.
Follow the given steps to activate the keyboard mouse:
To edit this feature, first you should log onto your computer with administrative rights.
To activate this feature, press Alt+Shift+NumLock keys at once and you will receive a small MouseKey box.
To keep MouseKeys on, click on Ok button or click on cancel button to cancel MouseKeys box.
Click on Settings button, if you want to adjust the mouse cursor detail settings.
Here a new dialog box will appear with the title Settings for MouseKeys", now you can manage all mouse settings for example mouse cursor speed, acceleration and some other features.
Now using Numeric keypad, you can move your mouse pointer. The controls are:
1,2,3,4,6,7,8 and 9 keys are used to move the mouse cursor into different directions.
Key 5 is used as mouse click button.
Insert key used to hold down mouse button.
+ Sign used to double click on any object.
Delete button used to release the mouse.
Click on NumLock button to disable this keyboard mouse feature.
Print and Edit Through DOS Mode [TIP]
If you are working at the Command Prompt your can modify and print the text file very easily. There are different ways to print text a file while working at the Command Prompt. Assuming the file you want to print is in your current folder, you can type here with your file name with extension. For example
print filename.txt
and press Enter. Here .txt is the file extension. You must use the extension. Now in the same way you can edit this file before printing with given command
edit filename.txt
and press Enter. This command opens the MS-DOS Editor to edit this file. Edit the file and then press Alt, F, P to print it.
How to connect your home computer from Remote location [TIP]
Using the Remote Desktop feature, you can connect your home computer (host) from any other remote computer (client) and can access all computer resources (installed programs, data and any network resources). You can run any computer application on the remote computer as you were running actually sitting in front of home computer.
Follow the given steps to configure your computer to connect remote computer:
To use this feature, you will need to be logged into your computer with administrative rights.
To perform this task, first make sure your both computers are connected to the internet.
First you have to configure the host computer that allows the users to connect it remotely. On the host computer, right click on "My computer" and click on Properties option.
Under the Remote tab, select the option "Allow users to connect remotely to this computer" and click Ok button.
Now get the IP address of host computer (type the "ipconfig /all" on the command prompt of host computer to find IP address).
Now make a connection on remote or client computer, click on Start button, go to All Programs> Accessories, and Communications, then click on Remote Desktop Connection, option. A Remote Desktop Connection, dialog box will appear.
Click on Options button for detail configuration, under the General tab, type the IP address of host computer in the Computer box and also type username and password of host computer then click on Connect button to make a connection to remote computer.
If your username and password is correct then a remote desktop windows will appear.
How to log off, restart and shutdown, connected computer from one location [TRICK]
Windows XP has a built-in feature (shutdown tools) that is used to shutdown any connected computers from any one computer. Using this feature, you can log off, restart and shutdown any computer in your network. This tip is very useful for you, if you are a Network Administrator at your company, because if you have experience to shutdown all connected computers daily in your local area network one by one, definitely that job is annoying responsibility for you.
Follow the given steps to configure shutdown tool on your computer:
To use this feature, you will need to be logged into your computer with administrative rights.
To perform this task, first make sure your both computers are directly connected or connected to network.
Click Start button then type shutdown -i in Run option then press Enter for next.
A small windows dialog box will appear with the title "Remote Shutdown Dialog".
Here first click on "Add" button to add computer, a small Add computers window will open, here type the name or IP address of the computer (you can add many computer for same action) that you want to turned off, then press OK for next.
Now select the action "What do you want these computers to do (log off, restart or shutdown)". If you want to warn your users about this action, select the check box "Warn users of the action" then set time, display warning for 30 seconds or more.
Now select the option that describes the reason to shutdown the computers and also type some comments for users.
Now when you press the OK button, the users will see a "System Shutdown Windows "with time and comments that you had been set.
Activate DLL's File of your Computer using Run command [TRICK]
DLL's (dynamic link library), basically a combination of executables files that can be used by Windows programs to run properly. Some time you received a sudden pop-up message "System could not fine this DLL file" for example binkw32, maxkernl. Normally you received these types of messages when you installed any new application, computer driver program and some time due to computer mishandling. Actually some DLL files are deactivated due to new software's installation but don't worry you can reactivate these file with the help of a simple command called Regsvr32.
To activate the missing dll file go the Start then Run and type here "regsrv32 with missing dll file name" for example you missed "urlmon.dll" file then you will type in Run "regsvr32 urlmon.dll" and press Ok button. Your system will activate this missing file and hopefully you will not get this missing message again.
To activate the missing dll file go the Start then Run and type here "regsrv32 with missing dll file name" for example you missed "urlmon.dll" file then you will type in Run "regsvr32 urlmon.dll" and press Ok button. Your system will activate this missing file and hopefully you will not get this missing message again.
Low Hard Drive Space warning messages? SOLVE IT [TRICK]
In windows XP, when you’re hard disk space of any drive left 200 MB or less than 200 MB, it begins you a alerting message “You are running out of disk space on drive C or D. To free space on this drive by deleting old or unnecessary file, click here.” May be this warning message is useful for the maintenance of your hard disk space, and remind you to uninstalling unnecessary programs and deleting temporary files. But some time this message annoying, especially once you well aware about this situation. To disable this warnings message permanently, you have to edit the computer registry. But the best technique to edit the windows registry keys, always export or backup the whole windows registry keys on backup drive before editing. Because any mistake in Registry can cause problem in your computer to run properly.
Follow the given steps to disable the warning message.
First click on Start button then type Regedit in Run option.
In Registry Editor panel go to the path:
HKEY_CURRENT_USER\Software\Microsoft\Windows\CurrentVersion\Policies\ Explorer.
Here in right hand side panel, create the new DWORD value, Value name “NoLowDiskSpaceChecks”.
Now double click on that value, now set its value 1 and press OK.
Now restart your computer after any changes to go into effect.
Create your computer password recovery disk [TIP]
If you are using Windows XP, you can create the windows password reset disk. This password-reset disk will help you to log on to your computer when you forget the computer password. But if you forget your windows password and don't have any password recovery or password reset disk then you will have to reinstall the windows XP on your computer again, because there is no easy way to break the windows password.
Follow the given steps to create password reset disks:
First click on start button to open control panel and then click here on User accounts option.
In User accounts dialog box, double click on the account name for you want to create the password-reset disk.
Click on Prevent a forgotten password under the Related Tasks option on the left side of User accounts dialog box.
Now Welcome page of forgotten password wizard will open and press Next button.
Here insert a new formatted floppy disk in your computer floppy disk drive and press Next button.
Now type your current password and press Next to finish.
DOS LEARNING to handle the files (COMMAND PROMPT)
(1) click on START go to RUN and type CMD.EXE
(2) press ALT+TAB (this will enlarge the DOS window into full screen)
(3) type CD.. again and again till you get to the c drive (like C:\>)
(4) now type DIR (it will show all files & folders in C drive now look for the WINDOWS folder)
(5) type CD WINDOWS (it will change patch C:\> to C:\ windows> it means now windows folder has opened)
(6) type DIR again (you will find a long list of files passed with the blink of eye )
(7) to see all the files and folders in windows folder, type DIR/P (it pauses the flow of files after one screen )
(8) find the system32 folder, if you can’t then type simply CD SYSTEM32 (now the path is changed into C:\windows\system32>
(9) type DIR ( you will see a very long list of files exist in the system32 folder)
(10) To check the files and in trying to find some specific files, different characters are used with DIR command after forward slash (/) these are called switches, write these commands to understand switches:
DIR/P (Pauses after each screen full information) DIR/W (shows files in Wide format)
DIR/AH (shows all files with the Attribute Hidden)
DIR/AR (shows all files with the Attribute Read only)
DIR/AS (shows all files with the Attribute System)
DIR/AA (shows all files with the Attribute Achieve)
DIR/ON (shows all files in alphabetic Order Name wise) DIR/O-N (Reverse output)
DIR/OS (shows all files in the Order of Size smallest first) DIR/O-S (Reverse output)
DIR/OE (shows all files in alphabetic Order by the extension) DIR/O-E (Reverse output)
DIR/OD (shows all files in the Order of Date oldest first) Dir/O-D (Reverse Output)
DIR/B (shows files in Bare format)
DIR/S DIR/L DIR/X DIR/Q DIR/T DIR/4
(Check these commands and consider the result by your own)
You can also combine these commands switches with each other
e.g. DIR/W/P (shows files in Wide format And Pauses the flow of files)
now type CLS (this command will Clear The Screen)
What are the results of these commands? Think!
DIR/ON/P DIR/OS/W DIR/OS/W/P DIR/OD/ON/OS/P DIR/AH/AR/P
(11) There are two characters question mark (?) and asteric (*) which are called wild cards they are
Used to find out the files which names or extensions are unknown, type these commands to understand:
DIR *.EXE (displays all files which names are whatever but extension is .EXE)
DIR A*.* (displays all files which names start with A and extension is whatever)
DIR C??C.EXE (displays all files which name consists of 4 characters in which middle two characters are unknown and extension is .EXE)
DIR A*Z.E* (displays all files which name starts with A, ends with Z, middle characters are whatever and the extension’s 1st letter is E)
What is the result of these commands? Think!
DIR *A*.DLL DIR CH???K.EXE DIR *A*T*B.* DIR N*RR*R.EXE
DIR *.* DIR A*.D* DIR ?A?.* DIR *TASK*.exe
You can also combine switches and wildcards to get more accurate results, Check these commands in DOS:
DIR/P *.exe (it will show all .exe files and may pause the each running screen)
DIR/P/W A*.* (it will show all files of any extension which names starts with A and may be shown in wide format and pause the screen each time)
Now what is the result of these commands? Think!
DIR/AH C*B* DIR/ON/P A*Z.* DIR/O-S/W/P *.DLL DIR/B/P ?A????.EXE
DIR/AR/O-D/P *S*.D* DIR/AA/B/P *M*N*.* DIR *A*E*I*.*
(12) now type CD.. type again CD.. (till you get to the position C:\>)
(13) type D: then press enter (it will change prompt C:\> to D:\>)
(14) type MD PAKISTAN (it will make a folder named PAKISTAN in D: drive)
(15) type CD PAKISTAN (it will open PAKISTAN now path is D:\PAKISTAN>)
(16) type EDIT (DOS will upon EDIT program, it is like NOTEPAD to type the text)
(17) type any English story and then use the mouse to go to FILE menu then click on SAVE
In the FILE NAME type this D:\PAKISTAN\STORY.TXT (it will save a file named as STORY.TXT in the D drive and in PAKISTAN folder)
Now click on FILE and then click NEW and make another file ESSAY.TXT and write any essay in it. Then SAVE it in the same path e.g. D:\PAKISTAN\ESSAY.TXT you can also OPEN a file from the path where it was saved e.g. click on OPEN and type the path D:\PAKISTAN\STORY.TXT and click OK, it will open STORY.TXT file from the D drive and from PAKSITAN folder.
Make some other files like LETTER.TXT APPLICATION.TXT DIALOGUE.TXT and save it in the same path e.g. D:\PAKISTAN\LETTER.TXT
To close the EDIT program go to FILE menu and click on EXIT
(18) COPY is the command in DOS which is used to copy the files from one path to another. It is also used to combine text files and make a new file. suppose if you want to copy STORY.TXT from D drive and Pakistan folder (D:\PAKISTAN) to C Drive then you may write this command in DOS:
COPY D:\PAKISTAN\ C:\
It will show the output that “1 FILE COPIED”
And what if you want to copy all .TXT files from D:\PAKISTAN\ TO C:\?
Type COPY D:\PAKISTAN *.TXT C:\ (HINT: you can also use wildcards * ? with the files like in the above command)
Lets combine all the text files you have just created in Pakistan folder
Type COPY D:\PAKISTAN\ESSAY.TXT+STORY.TXT+LETTER.TXT C:\ENGLISH.TXT
It will combine 3 files : ESSAY.TXT, STORY.TXT, LETTER.TXT and make a new file ENGLISH.TXT by the combination of these three files
And whenever you want to copy files from CDROM or any DRIVE like E, F etc.
Type COPY then press space and then type the full path and file names with their extensions then type the path where you want to save the file, the following command will copy pictures (.JPG files) from E:\MY PICTURES to D:\MY FAMILY PICTURES
COPY E:\MY PICTURES\*.JPG D:\MY FAMILY PICTURES
(19) Here are some more useful commands used in DOS:
(i) TIME command is used to check the time and change the time, to change the time type TIME hh:mm:ss and then press enter where hh=current hours, mm=current minutes,ss=current seconds
Example: type TIME 12:30:30 ( it will change the time to 12:30:30)
(ii) DATE (is used to view the date and change the date, to change the date type DATE mm-dd-yyyy)
Example: type DATE 06-05-2009 (it will change the date to 06/05/2009
(iii) FORMAT command is used to format a drive (format erases all data in a drive and makes sectors and tracks for that drive in the hard disk)
Example: FORMAT D: (it will erase all data in the drive D , Becarefull to use this command)
(iv) DEL command is used to delete a file or a number of files.
Example1: DEL D:\PAKISTAN\ESSAY.TXT (it will delete ESSAY.TXT file from PAKISTAN directory in the D drive)
Example2: DEL D:\PAKISTAN\*.TXT (it will delete all .TXT files)
(v) RD command is used to remove an empty folder (directory)
Example: RD D:\PAKISTAN
(vi) TREE command is used to display the folder structure of a drive graphically
Examples: type TREE C: type TREE D: etc.
(vii) VER command is used to show the version of DOS
Example: type VER (check what the output comes)
NOTE: all commands are written here in uppercase letters (e.g. ABC) and all commands work when you press enter. Repeat the commands again and again to enhance your learning skills.
(2) press ALT+TAB (this will enlarge the DOS window into full screen)
(3) type CD.. again and again till you get to the c drive (like C:\>)
(4) now type DIR (it will show all files & folders in C drive now look for the WINDOWS folder)
(5) type CD WINDOWS (it will change patch C:\> to C:\ windows> it means now windows folder has opened)
(6) type DIR again (you will find a long list of files passed with the blink of eye )
(7) to see all the files and folders in windows folder, type DIR/P (it pauses the flow of files after one screen )
(8) find the system32 folder, if you can’t then type simply CD SYSTEM32 (now the path is changed into C:\windows\system32>
(9) type DIR ( you will see a very long list of files exist in the system32 folder)
(10) To check the files and in trying to find some specific files, different characters are used with DIR command after forward slash (/) these are called switches, write these commands to understand switches:
DIR/P (Pauses after each screen full information) DIR/W (shows files in Wide format)
DIR/AH (shows all files with the Attribute Hidden)
DIR/AR (shows all files with the Attribute Read only)
DIR/AS (shows all files with the Attribute System)
DIR/AA (shows all files with the Attribute Achieve)
DIR/ON (shows all files in alphabetic Order Name wise) DIR/O-N (Reverse output)
DIR/OS (shows all files in the Order of Size smallest first) DIR/O-S (Reverse output)
DIR/OE (shows all files in alphabetic Order by the extension) DIR/O-E (Reverse output)
DIR/OD (shows all files in the Order of Date oldest first) Dir/O-D (Reverse Output)
DIR/B (shows files in Bare format
DIR/S DIR/L DIR/X DIR/Q DIR/T DIR/4
(Check these commands and consider the result by your own)
You can also combine these commands switches with each other
e.g. DIR/W/P (shows files in Wide format And Pauses the flow of files)
now type CLS (this command will Clear The Screen)
What are the results of these commands? Think!
DIR/ON/P DIR/OS/W DIR/OS/W/P DIR/OD/ON/OS/P DIR/AH/AR/P
(11) There are two characters question mark (?) and asteric (*) which are called wild cards they are
Used to find out the files which names or extensions are unknown, type these commands to understand:
DIR *.EXE (displays all files which names are whatever but extension is .EXE)
DIR A*.* (displays all files which names start with A and extension is whatever)
DIR C??C.EXE (displays all files which name consists of 4 characters in which middle two characters are unknown and extension is .EXE)
DIR A*Z.E* (displays all files which name starts with A, ends with Z, middle characters are whatever and the extension’s 1st letter is E)
What is the result of these commands? Think!
DIR *A*.DLL DIR CH???K.EXE DIR *A*T*B.* DIR N*RR*R.EXE
DIR *.* DIR A*.D* DIR ?A?.* DIR *TASK*.exe
You can also combine switches and wildcards to get more accurate results, Check these commands in DOS:
DIR/P *.exe (it will show all .exe files and may pause the each running screen)
DIR/P/W A*.* (it will show all files of any extension which names starts with A and may be shown in wide format and pause the screen each time)
Now what is the result of these commands? Think!
DIR/AH C*B* DIR/ON/P A*Z.* DIR/O-S/W/P *.DLL DIR/B/P ?A????.EXE
DIR/AR/O-D/P *S*.D* DIR/AA/B/P *M*N*.* DIR *A*E*I*.*
(12) now type CD.. type again CD.. (till you get to the position C:\>)
(13) type D: then press enter (it will change prompt C:\> to D:\>)
(14) type MD PAKISTAN (it will make a folder named PAKISTAN in D: drive)
(15) type CD PAKISTAN (it will open PAKISTAN now path is D:\PAKISTAN>)
(16) type EDIT (DOS will upon EDIT program, it is like NOTEPAD to type the text)
(17) type any English story and then use the mouse to go to FILE menu then click on SAVE
In the FILE NAME type this D:\PAKISTAN\STORY.TXT (it will save a file named as STORY.TXT in the D drive and in PAKISTAN folder)
Now click on FILE and then click NEW and make another file ESSAY.TXT and write any essay in it. Then SAVE it in the same path e.g. D:\PAKISTAN\ESSAY.TXT you can also OPEN a file from the path where it was saved e.g. click on OPEN and type the path D:\PAKISTAN\STORY.TXT and click OK, it will open STORY.TXT file from the D drive and from PAKSITAN folder.
Make some other files like LETTER.TXT APPLICATION.TXT DIALOGUE.TXT and save it in the same path e.g. D:\PAKISTAN\LETTER.TXT
To close the EDIT program go to FILE menu and click on EXIT
(18) COPY is the command in DOS which is used to copy the files from one path to another. It is also used to combine text files and make a new file. suppose if you want to copy STORY.TXT from D drive and Pakistan folder (D:\PAKISTAN) to C Drive then you may write this command in DOS:
COPY D:\PAKISTAN\ C:\
It will show the output that “1 FILE COPIED”
And what if you want to copy all .TXT files from D:\PAKISTAN\ TO C:\?
Type COPY D:\PAKISTAN *.TXT C:\ (HINT: you can also use wildcards * ? with the files like in the above command)
Lets combine all the text files you have just created in Pakistan folder
Type COPY D:\PAKISTAN\ESSAY.TXT+STORY.TXT+LETTER.TXT C:\ENGLISH.TXT
It will combine 3 files : ESSAY.TXT, STORY.TXT, LETTER.TXT and make a new file ENGLISH.TXT by the combination of these three files
And whenever you want to copy files from CDROM or any DRIVE like E, F etc.
Type COPY then press space and then type the full path and file names with their extensions then type the path where you want to save the file, the following command will copy pictures (.JPG files) from E:\MY PICTURES to D:\MY FAMILY PICTURES
COPY E:\MY PICTURES\*.JPG D:\MY FAMILY PICTURES
(19) Here are some more useful commands used in DOS:
(i) TIME command is used to check the time and change the time, to change the time type TIME hh:mm:ss and then press enter where hh=current hours, mm=current minutes,ss=current seconds
Example: type TIME 12:30:30 ( it will change the time to 12:30:30)
(ii) DATE (is used to view the date and change the date, to change the date type DATE mm-dd-yyyy)
Example: type DATE 06-05-2009 (it will change the date to 06/05/2009
(iii) FORMAT command is used to format a drive (format erases all data in a drive and makes sectors and tracks for that drive in the hard disk)
Example: FORMAT D: (it will erase all data in the drive D , Becarefull to use this command)
(iv) DEL command is used to delete a file or a number of files.
Example1: DEL D:\PAKISTAN\ESSAY.TXT (it will delete ESSAY.TXT file from PAKISTAN directory in the D drive)
Example2: DEL D:\PAKISTAN\*.TXT (it will delete all .TXT files)
(v) RD command is used to remove an empty folder (directory)
Example: RD D:\PAKISTAN
(vi) TREE command is used to display the folder structure of a drive graphically
Examples: type TREE C: type TREE D: etc.
(vii) VER command is used to show the version of DOS
Example: type VER (check what the output comes)
NOTE: all commands are written here in uppercase letters (e.g. ABC) and all commands work when you press enter. Repeat the commands again and again to enhance your learning skills.
HIDE ALL DRIVES IN MY COMPUTER مائی کمپیوٹر میں موجود تمام ڈرائیوز کوچھبانے کا طریقہ
(1)
Go to start->run.Type regedit. Now go to:
اسٹارٹ ميں جاکر لکھيں regedit
(2)
پھر مندرجہ زيل پاتھ کو تلاش کرکے وہاں جائيں
HKEY_CURRENT_USER>Software>Microsoft>Windows>CurrentVersion>Policies>Explorer
(3)
اب دائيں طرف والي جگہ پر جہاں مختلف قسم کي فائلوں جيسي چيزيں نظر آئيں گي وہاں رائٹ کلک کريں
اور پھر نيو ميں جا کر
Dword پہ کلک کريں
اور اس کو نام ديں بالکل ايسے جيسے يہ لکھا ہے?
NoDrives
(4)
Now in the right pane create a new DWORD item and name it NoDrives(it is case sensitive).
(5)
اب اس پہ ڈبل کلک کريں اور يہ والي مقدار لکھيں?
3FFFFFF
Now modify it's value and set it to 3FFFFFF (Hexadecimal).
اب اپنا کمپيوٹر ري سٹارٹ کريں?
Now restart your computer.
(6)
So, now when you click on My Computer, no drives will be shown(all gone...). To enable display of drives in My Computer, simply delete this DWORD item that you created.Again restart your computer.You can now see all the drives again.
اب مائي کمپيوٹر کو کھوليں اور آپ نتيجہ ديکھ سکتے ہيں کہ تمام ڈرائيوز غائب ہو چکے ہيں اب اگر آپ واپس لانا چاہتے ہيں تو دوبار ہ اسي جگہ جا کر جو آپ نے فائل بنائي تھي
Dword
والي اس کو ڈيليٹ کرديں اور پھر ري سٹارٹ کرديں تو پھر دوبارہ ڈرائيوز واپس آجائيں گے?
Watch Animated text star war movie in Command prompt }TRICK
(1) go to start>run and type CMD
(2) type this command exact as it is and press enter
telnet towel.blinkenlights.nl
(2) type this command exact as it is and press enter
telnet towel.blinkenlights.nl
NTFS vs. FAT
To NTFS or not to NTFS—that is the question. But unlike the deeper questions of life, this one isn't really all that hard to answer. For most users running Windows XP, NTFS is the obvious choice. It's more powerful and offers security advantages not found in the other file systems. But let's go over the differences among the files systems so we're all clear about the choice. There are essentially three different file systems available in Windows XP: FAT16, short for File Allocation Table, FAT32, and NTFS, short for NT File System.
FAT16
The FAT16 file system was introduced way back with MS–DOS in 1981, and it's showing its age. It was designed originally to handle files on a floppy drive, and has had minor modifications over the years so it can handle hard disks, and even file names longer than the original limitation of 8.3 characters, but it's still the lowest common denominator. The biggest advantage of FAT16 is that it is compatible across a wide variety of operating systems, including Windows 95/98/Me, OS/2, Linux, and some versions of UNIX. The biggest problem of FAT16 is that it has a fixed maximum number of clusters per partition, so as hard disks get bigger and bigger, the size of each cluster has to get larger. In a 2–GB partition, each cluster is 32 kilobytes, meaning that even the smallest file on the partition will take up 32 KB of space. FAT16 also doesn't support compression, encryption, or advanced security using access control lists.
FAT32
The FAT32 file system, originally introduced in Windows 95 Service Pack 2, is really just an extension of the original FAT16 file system that provides for a much larger number of clusters per partition. As such, it greatly improves the overall disk utilization when compared to a FAT16 file system. However, FAT32 shares all of the other limitations of FAT16, and adds an important additional limitation—many operating systems that can recognize FAT16 will not work with FAT32—most notably Windows NT, but also Linux and UNIX as well. Now this isn't a problem if you're running FAT32 on a Windows XP computer and sharing your drive out to other computers on your network—they don't need to know (and generally don't really care) what your underlying file system is.
The Advantages of NTFS
The NTFS file system, introduced with first version of Windows NT, is a completely different file system from FAT. It provides for greatly increased security, file–by–file compression, quotas, and even encryption. It is the default file system for new installations of Windows XP, and if you're doing an upgrade from a previous version of Windows, you'll be asked if you want to convert your existing file systems to NTFS. Don't worry. If you've already upgraded to Windows XP and didn't do the conversion then, it's not a problem. You can convert FAT16 or FAT32 volumes to NTFS at any point. Just remember that you can't easily go back to FAT or FAT32 (without reformatting the drive or partition), not that I think you'll want to.
The NTFS file system is generally not compatible with other operating systems installed on the same computer, nor is it available when you've booted a computer from a floppy disk. For this reason, many system administrators, myself included, used to recommend that users format at least a small partition at the beginning of their main hard disk as FAT. This partition provided a place to store emergency recovery tools or special drivers needed for reinstallation, and was a mechanism for digging yourself out of the hole you'd just dug into. But with the enhanced recovery abilities built into Windows XP (more on that in a future column), I don't think it's necessary or desirable to create that initial FAT partition.
When to Use FAT or FAT32
If you're running more than one operating system on a single computer, you will definitely need to format some of your volumes as FAT. Any programs or data that need to be accessed by more than one operating system on that computer should be stored on a FAT16 or possibly FAT32 volume. But keep in mind that you have no security for data on a FAT16 or FAT32 volume—any one with access to the computer can read, change, or even delete any file that is stored on a FAT16 or FAT32 partition. In many cases, this is even possible over a network. So do not store sensitive files on drives or partitions formatted with FAT file systems.
How to clear My Documents history automatically on log off [TRICK]
Today tip will help you to clear your recently opened documents
automatically on windows log off. Your family members and co-workers can
find out your documents browsing activities with clicking on documents list
menu. However this tip is very useful for you, if you are sharing your
computer with others or you do not want that other persons know about your
last visited documents history. This trick will work in nearly all of the
windows versions like windows 2000, XP and 2003.
Follow the given steps for configuration to clear recently opened documents
automatically:
To edit the computer registry, first you should log onto your computer with
administrative rights.
Click Start button and type regedit in Run option then press Enter for next.
Navigate to HKEY_Current_User \ SOFTWARE \ Microsoft \ Windows \
CurrentVersion \Policies\Explorer
Now in right side panel, click right to create a new DWORD value with the
name ClearRecentDocsOnExit and then set its value to 1.
But next time, if you want to disable this functionality then simply change
the value of data box to 0 or delete the ClearRecentDocsOnExit DWORD item.
Now close the registry editor and restart your computer after any changes
Disable "CLEAR HISTORY" button from the Internet Explorer
Do there are many users of your computer?
do they browse il-legal & Sexual sites and clear the history when you get to your pc?
here is a trick which will really make them bother when they would go to clear history button but won't find it :D
(1) goto START>RUN type gpedit.msc
(2) then go to
UserConfiguration>AdministrativeTemplates>WindowsComponent>InternetExplorer
(3) and on the right side open "DISABLE CHANGING HISTORY SETINGS" and enable it and apply.
now go to your internet explorer and check clear history button !
;) Enjoy.
[TUT] Show Fake video on yahoo messanger webcam
sNAPS PROVIDED FOR PROPER GUIDE
download Fake webcam software from here
Download here
now install and open it
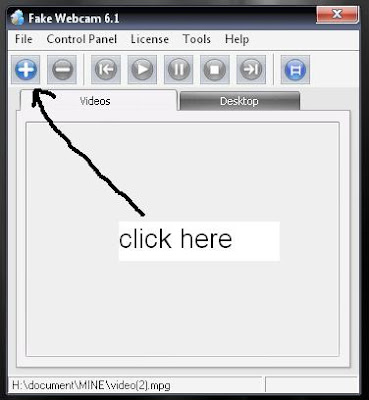
click on add video button.
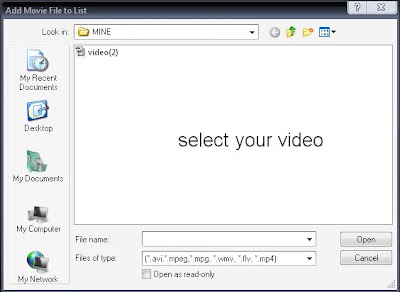
select your video
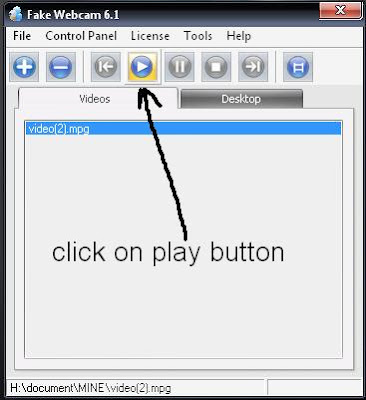
and press play button
now open yahoo mesenger
Goto Messenger -->> My Webcam
your webcam screen will open
then goto File -->> Prefrence
click on camera source
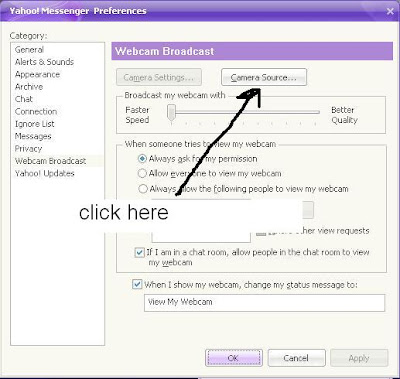
now select source fake webcam
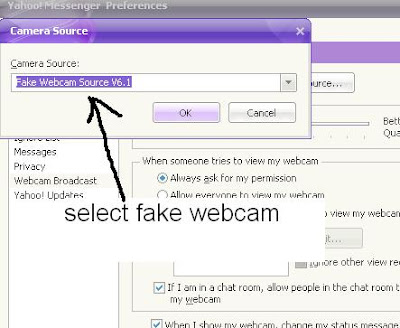
now its done
make fool to your frnds
N-joyyyyyy.
:)))
download Fake webcam software from here
Download here
now install and open it
click on add video button.
select your video
and press play button
now open yahoo mesenger
Goto Messenger -->> My Webcam
your webcam screen will open
then goto File -->> Prefrence
click on camera source
now select source fake webcam
now its done
make fool to your frnds
N-joyyyyyy.
:)))
How to change the default location of program installation [TRICK]
You might want to change the location of your system default folder (C:\Program Files) from C drive to another system drives (D or E drive). By default software setup will attempt to install program in C:\Program Files directory. It is good practice to make the backup of the installed programs, if you installed all your programs in other than C drive. If you have little knowledge about editing windows registry then you can configure your computer for this purpose.
Follow the given steps to configure windows registry:
First click on Start button then type Regedit in Run option.
Here locate the location to:
Go to HKEY_LOCAL_MACHINE\SOFTWARE\Microsoft\Windows\CurrentVersion
Here in right side panel, double click on ProgramFileDir and here its default value is
C:\Program Files.
Now modify the value to any other drive (for example D:\Program Files).
Now close the registry editor and restart your computer after any changes to go into effect.
Use Multi Yahoo Without Any Software [Trick]
Follow these steps
1. Go to Start ----> Run . Type regedit, then enter .
2.Navigate to HKEY_CURRENT_USER --------> Software --->yahoo ----->pager---->Test
3.On the right pane , right-click and choose new Dword value .
4.Rename it as Plural.
5.Double click and assign a decimal value of 1.
That's it done!!
Now close registry and restart yahoo messenger .For signing in with new id open another messenger
[Trick]Unlock Windows 7 GodMode

Windows 7 GodMode basically lets users access all of the operating system's control panels from within a single folder like one huge control panel for all the OS settings.
OLD for NOOBS NOw SAy
This is very simple to unlock, all you have to do is create a folder in a directory of your choice and name it with the following string:
Code:
GodMode.{ED7BA470-8E54-465E-825C-99712043E01C}
DONE :)
ENJOY
Facebook Chat Emoticons
try these codes in facebook chat.
smile :-) :) :] =)
tongue :-P :P :-p :p =P
wink ;-) ;)
grin :-D :D =D
curly lips :3
kiss :-* :*
grumpy >:( >:-(
glasses 8-) 8) B-) B)
sunglasses 8-| 8| B-| B|
upset >:O >:-O >:o >:-o
confused o.O O.o
shark (^^^)
gasp :-O :O :-o :o
pacman :v
squint -_-
devil 3:) 3:-)
unsure :/ :-/ :\ :-\
frown :-( :( :[ =(
cry :'(
Chris Putnam :putnam:
robot :|]
heart ♥
angel O:) O:-)
kiki ^_^
penguin <(")
Convert Your Pictures Into simple Text [Tip]
you can convert your pictures into text so that you can use this text to anywhere e.g. as signature of ur emails or use it in ms-word etc...
1) go to click here
2) click on browse and select your picture then click on convert.
3) now see the result .
(note: you can also change your pics to ascii codes or matrix movie code style)
1) go to click here
2) click on browse and select your picture then click on convert.
3) now see the result .
(note: you can also change your pics to ascii codes or matrix movie code style)
Avoid auto play of CD
How to Avoid auto play of CD ? Way I like best tip.
Hey this time no registry trick even though there are ways in registry to do it. In earlier operating systems only those CD that had autorun.inf file in their root directory were able to execute on its own but with advent of WINDOWS XP it has become possible with just about anything. Well sometimes it is good but there are other times when you want to avoid this part of automation. What would I do. Simply press SHIFT key when you enter a CD in your CD drive. It won't Auto play. For those of you, who do want a registry hack. Here it is:
Open Registry and navigate to [HKEY_LOCAL_MACHINE\SOFTWARE\Microsoft\Windows\CurrentVersion\policies\Explorer] and look for key "NoDriveTypeAutoRun" and set its value to 185 (decimal). This would stop autoplay.
Always Take backup of the registry before making any registry trick
improve on computer shutdown time
How to improve on shutdown time ? Close apps automatically & quickly at shutdown tip:
Open Registry by going to START-RUN and typing REGEDIT. Navigate to HKEY_CURRENT_USER\CONTROL PANEL\DESKTOP and look for AutoEndTasks. On my computer default value is 0. Change it to 1. Thats all. Further more you can reduce the time it takes for Windows to issue kill directive to all active/hung applications.
In doing this only constraint that you should make sure exists is that HungAppTimeout is greater than WaitToKillAppTimeout. Change the values of WaitToKillAppTimeout to say 3500 (since default value for HungAppTimeout 5000 and for WaitToKillAppTimeout is 20000)
Always Take backup of the registry before making any registry trick
accelerate your internet speed
Hi everybody i m here to tell you a trick to increase internet speed
DO you know that about 20% of your internet bandwidth is reserved by Microsoft.
---------------------------------------------------------------------------------------------------------
Uses of Reserved Bandwidth
** Windows Automatic Updates rely on this reserved bandwidth.
** Fast loading Microsoft Websites
** Sending Error Reports
** Online Help support in Microsoft Office
---------------------------------------------------------------------------------------------------------
But this can be recovered back...
---------------------------------------------------------------------------------------------------------
The Remedy
** Start >> Run
** Type gpedit.msc
** This opens the Policy Editor
** Now, Local Computer Policy >> Computer Configuration
** Then, Administrative Templates >> Network
** Now, click on QOS Packet Scheduler
** Now, on Right hand side
** Double Click Limit reservable bandwidth
** Now in Setting Tab
***************************************************
It says : Not Configured
Reality : The Explain Tab says "By default, the Packet Scheduler limits the system to 20 percent of the bandwidth of a connection"
***************************************************
** So, on Setting Tab select Enabled
** Now, change Bandwidth limit (%) to 0 (Zero)
** Click OK !!!
for writing in bold in facebook chat box and underline text
for writing in bold in facebook chat box use * example *BOLD* now the word bold will b bold.. in the same manner for underline use _underline_ now it will be underlied
Auto Confirm Friend Requests if you have hundereds of friend requests ! (facebook tips and tricks)
Auto Confirm Friend Requests if u have hundereds of friend requests !
------------------------------------------------------------------------
this thing works with the mozilla firefox only.
1st go to download here and click on ADD TO FIREFOX
and install this plugin. restart the browser after installation
now go to TOOLS> GREASEMONKEY > and click on ENABLED
now go to click here and cick on INSTALL
now login to your facebook account and go to the FRIEND REQUEST and wait for some time.
you could see that all requests are confirming automatically.
change your facebook language (TIP)
facebook provides you many languages and you can choose one of them which is your native language or you may like one.
go to SETTINGS > ACCOUNT SETTINGS LANGUAGE and select your language you want the whole facebook to be in it.
for urdu loving users, you can choose urdu language too!
go to SETTINGS > ACCOUNT SETTINGS LANGUAGE and select your language you want the whole facebook to be in it.
for urdu loving users, you can choose urdu language too!
Invite all your friends to your group within seconds ! (facebook tips and tricks)
Invite all your friends to your group within seconds !
----------------------------------------------------------------
if u have created a group and you want your friends to join this group then you must select each one and send them invitation, it is time consuming and boring
let me tell you an interesting way.
1st go to your group and click on INVITE PEOPLE TO JOIN
now copy this code and paste it on the ADRESS BAR
javascript:elms=document.getElementById('friends').getElementsByTagName('li');for(var fid in elms){if(typeof elms[fid] === 'object'){fs.click(elms[fid]);}}
now press enter, you can see your all friends have been selected, now simply click on SEND INVITATIONS.
NO-NAME TRICK! (latest facebook tips and tricks)
NO-NAME TRICK!
-----------------
press the keys in this sequence:
UP UP DOWN DOWN LEFT RIGHT LEFT RIGHT B A ENTER
now look what appears on the facebook page!
(if it doesn't work then go to your profile page and make sure CAPSLOCK is on and repeat the same
key sequence)
-----------------
press the keys in this sequence:
UP UP DOWN DOWN LEFT RIGHT LEFT RIGHT B A ENTER
now look what appears on the facebook page!
(if it doesn't work then go to your profile page and make sure CAPSLOCK is on and repeat the same
key sequence)
Facebook Chat Messenger? (facebpok tips and tricks)
Facebook Chat Messenger?!
---------------------------
here is a tool which works like a facebook messenger.its very useful.
download from here and install it : Download here
-----------------------------
---------------------------
here is a tool which works like a facebook messenger.its very useful.
download from here and install it : Download here
-----------------------------
Edit facebook 1st page's Text & Text Boxes (facebook tips and trick)
Edit facebook 1st page's Text & Text Boxes
--------------------------------------------
open facebook.com and now in the address bar put this code:
javascript: document.body.contentEditable = 'true'; document.designMode = 'on'; void 0
and now you can select the text and remove it and write whatever u want on the 1st page.
you can also use this code to anysite!
-----------------------------------------
Download the Whole photo album from facebook
download FACEPAD tool from:
CLICK HERE
install it and restart the firefox, now right click on any album of your friend and click on DOWNLOAD
ALBUM WITH FACEPAD.
this tool only works with mozila firefox browser
-----------------------------------------------
CLICK HERE
install it and restart the firefox, now right click on any album of your friend and click on DOWNLOAD
ALBUM WITH FACEPAD.
this tool only works with mozila firefox browser
-----------------------------------------------
How to place Facebook chat on sidebar in MOzilla firefox
1)How to place Facebook chat on sidebar in MOzilla firefox
----------------------------------------------------------
Click on BOOKMARKS > ORGANIZE BOOKMARKS
Click on BOOKMARK MENU and then click on ORGANIZE >NEW BOOK MARK
a form will appear, now give this data,
Name: Facebook Chat
Location: http://www.facebook.com/presence/popout.php
and also CHECK (TICK) on LOAD THIS BOOK MARK IN THE SIDEBAR
now go to VIEW >SIDEBAR > BOOKMARKS> and now select facebook chat.
now you can see your facebook chat is appeared at the sidebar.
[trick]Make a photo background in drives
Perform the following steps ..
STEP1 )Open notepad and copy the following code :
[{BE098140-A513-11D0-A3A4-00C04FD706EC}]
iconarea_image=D:\Wallpapers\celeb\Genelia.jpg
iconarea_text=0x00FFFFFF
STEP2) Here, the path in the 2nd line of code represents the path of your picture.
STEP3) Now save this file as DESKTOP.INI in the location(any drive or any folder) where you desire to set the background picture.
STEP4) After setting it in your favourite location,close the drive and open the location again.
DONE !! .. your picture has been set as background picture for your desired location.
NOTE : Make sure that the extension in the path should be .jpg only and file should be saved as DESKTOP.INI only.
Friends ... SHARE your experiences in comments after performing this cool trick.Good luck !!
CREDITS:-
shoaib cheema
Watch Any movie in Paint Brush
1 Start a movie in any player.
2 Then open Paint.
3 Now, in the player when the movie is being played, press "Ctr + Print screen" button on your key board.
4 Now, Press Paste(ctrl+v) in Paint.
5 Leave the movie player open and don't minimize it.
6 Open Paint now and see the movie in the Paint..
2 Then open Paint.
3 Now, in the player when the movie is being played, press "Ctr + Print screen" button on your key board.
4 Now, Press Paste(ctrl+v) in Paint.
5 Leave the movie player open and don't minimize it.
6 Open Paint now and see the movie in the Paint..
MAGICS ON XP (windows xp tricks)
MAGIC #1
An Indian discovered that nobody can create a FOLDER anywhere on the computer which can be named as "CON". This is something pretty cool...and unbelievable. .. At Microsoft the whole Team, couldn't answer why this happened!
TRY IT NOW ,IT WILL NOT CREATE " CON " FOLDER
MAGIC #2
For those of you using Windows, do the following:
1.) Open an empty notepad file
2.) Type "Bush hid the facts" (without the quotes)
3.) Save it as whatever you want.
4.) Close it, and re-open it.
is it just a really weird bug? Confused?
MAGIC #3
microsoft crazy facts
This is something pretty cool and neat...and unbelievable. .. At Microsoft the whole Team, including Bill Gates, couldn't answer why this happened!
It was discovered by a Brazilian. Try it out yourself...
Open Microsoft Word and type
=rand (200, 99)
And then press ENTER
Youtube Tips & Tricks!
Youtube Tips & Tricks!
----------------------
1)a. Watch HD Videos (High Definitions)
""""""""""""""""""""""""""""""""""""""""
go to Google and suppose i want to search robots in youtube i will write the code like this.
robots site:youtube.com "Watch in normal quality watch in HD"
it will give many results, click anyone and see the result.
1)b. another way is to SIGN IN into youtube and go to ACCOUNT then go to PLAYBACK SETUP then select the 3rd & last option "I have a fast connection. Always play higher-quality video when it's available." and then click on SAVE CHANGES.
2)Download youtube videos for mobiles,Ipods,etc..
"""""""""""""""""""""""""""""""""""""""""""""""""
1st open a youtube video then copy its adress(Url)
now go to KeepHd and paste the url and click on download
now at the right side u may see many options choose the required one.
3)Search Through Username & Download Video in MP4 (for mobiles, ipods)
""""""""""""""""""""""""""""""""""""""""""""""""""""""""""""""""""""""
go to Ytpodcaster and in search type a username of whome you want to dowload videos for example my username is shoaib and if i search with it then it will show all videos posted by me.so i can download anyone in mp4 format.
4) Create A link for Specific Time in any video.
""""""""""""""""""""""""""""""""""""""""""""""""
1st sign in on youtube then open any video
now suppose u want to show others this video from 1 mint 30 second time u post the comment like this 1:30 check this video
now youtube will create a link: 1:30 in blue color so if anyone click on this the video will start from 1 mint 30 seconds !
5)Some Useful Website To Grap Videos From Youtube.
""""""""""""""""""""""""""""""""""""""""""""""""""
Vixy
keepvid
idesktop
try this: open any youtube video and type kick before youtube in the adress(url) and enter. now u may see many options to download this video.
6)Download Youtube & Facebook Videos Too!
"""""""""""""""""""""""""""""""""""""""""
download orbitdownloader from HERE
and install it now when u open a youtube video you can see a button appeared as GET IT. now you can get the videos from youtube and facebook too.
these videos are in .flv format so u must have flv player to run these files.
you can download flv player from HERE
FIND OUT WHO IS INVISIBLE IN YAHOO [TRICK]
Sometimes some of your friends who appear offline in yahoo messenger may not be actually offline,they may in the 'Invisible' mode.This maybe if they are trying to ignore you or are too busy to talk to anyone.
There is this small trick that you can use to find out what the truth is.
Firstly open your yahoo messenger main window and double click on the name of the person whom you want to check.The chat window will open obviously.
Click IMVironment button, select See all IMVironments, select Yahoo! Tools or Interactive Fun, and click on Doodle.
After loading the Doodle imvironment there can be two possibilities
1.If the user is offline Doodle will show this "waiting for your friend to load Doodle" continuously .
2. If the user is online (but in invisible mode), after few seconds, you should get a blank page.So you know that the user is online.
INTRESTING HACKING PUZZLE
hi all here i go with an intresting puzzle.. even beginners can solve upto 14th page...
link is given below.. to the refrence place..
not posting orignal link so all comments n questions cud be tracked in same place..
Give it a try :)
CLICK HERE
link is given below.. to the refrence place..
not posting orignal link so all comments n questions cud be tracked in same place..
Give it a try :)
CLICK HERE
[ Trick ] Put 250 songs in 64 mb mobile card
[ Trick ]put 250 songs in 64 mb mobile card
Download the converter from : click here to download
Yes u can put more than 250 songs in ur 64 mb mobile card by using this software .....
MP3 To Ringtone Gold is an ringtone converter. It can be used to convert the popular compressed audio formats (.mp3) to ringtone format(.mmf,.amr,.mp3,.wav, .mid) and send them to your cell phone. It can be used to rip multiple audio CDs at once .It also can be used as a mp3 resizer for your mp3 mobile phone.You can save any part of your favorite mp3s to ringtone format. 64MB mp3 mobile phone can support more than 250 songs.Simply drag and drop the songs you want onto the main screen.
and by using a special feuture "Big Mp3 into small mp3" u can compress your song.... e.g i have a mp3 song Dhoom 5.4 mb now it is only 250 kb after compressing
How To Speed Up utorrent downloading
How To Speed Up utorrent downloading ?
(1) Open utorrent program and click on PREFRENCE
(2) On the left side , click on CONNECTION and give value 43296 to PORT USEF FOR INCOMING CONNECTIONS, check all checkboxes but don’t check RANDOMIZE PORT EACH START
(3) Now click on BANDWIDTH and give 5 value to MAXIMUM UPLOAD RATE, give 0 to MAXIMUM DOWNLOAD RATE, 1000 to GLOBAL MAXIMUM NUMBER OF CONNECTIONS , 125 to MAXIMUM NUMBER OF CONNECTED PEERS PER TORRENT, 50 to NUMBER OF UPLOAD SLOTS PER TORRENT.
(4) Now click on BItTORRENT and check(tick) all check boxes and make sure OUTGOING is ENABLED
(5) Now click on QUEUEING and and give 3 value to MAXIMUM NUMBER OF ACTIVE TORRENTS, 5 to MAXIMUM NUMBER OF ACTIVE DOWNLOADS: , 100 to SEED WHILE RATIO IS and 0 TO SEEDING TIME, make check boxes are un-cheked,
(6) Now click APPLY AND CLICK OK
(7) Go to the file which is downloading and right click on it and change BANDWIDTH ALLOCATION to HIGH and SET UPLOAD LIMIT to 5
See the changes in speed!
How to dowload Old & Latest Large Capacity Softwares, Movies & Games ? {Torrents introduction}
BitTorrent is a peer-to-peer file sharing protocol used for distributing large amounts of data. BitTorrent is one of the most common protocols for transferring large files,u can download huge volume of softwares , movies, games etc...
(1) Download utorrent software from: Download here (click on utorrent stable) and then install it when it downloads.
(2) Now suppose you want to download the movie constantine then go to torrentz and type constantine in the search bar.
(3) U may see a list related to this movie and also their size at the right hand. Choose anyone you want to download , let I click the 1st one named Constantine 2005 DvDRip Eng BoBo ,
(4) Now u see many website links choose one of them as I choose vertor
(5) Click on DOWNLOAD TORRENT , this file may be of some Kbs , when it downloads open it with UTORRENT software,
(6) Now your movie is downloading and whethere you turn off or turn on your computer, the movie downloading will start from the remaining part, (but be sure that utorrent is running) . it is the best way ,as I suggest, to download movies and softwares and games etc..
Note:- Attention please ! some torrents websites may contain sexual contents like nude pictures etc. so it is recommended you to avoid these stuff , ignore it and just download torrent.
Subscribe to:
Comments (Atom)
